Are you looking to replace an HVAC coil but don’t know how to get the right measurements? Look no further! In this blog post, we’ll be discussing the basics of measuring an HVAC coil so you can order a replacement with confidence. Here’s what we’ll cover:
- Types of Commerical HVAC Coils
- What kind of measurements you need for ordering a replacement HVAC coil
- Tips and tricks for getting precise results.
By the end of this blog post, you should have all the information and tips you need to order a new HVAC coil with confidence. So let’s get started!
What Type of HVAC Coil are you measuring?
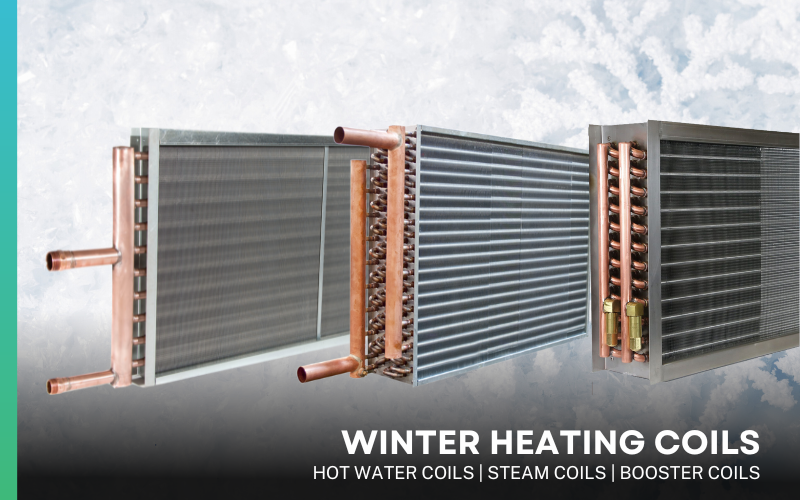
Knowing which type of coil you are measuring is essential to selecting the correct replacement to order. In general, there are 5 types of commercial HVAC coils that you should be aware of.
Fluid Coils
Supply connections are normally at the bottom of the coil, return bends are visible and the coil normally has vent and drain connections.
Standard Steam Coils
Coils have supply and return headers. The supply connection is normally located in the middle of the supply header and the condensate drain is located at the low point of the coil for complete drain-ability. Rows are limited to 4 and are connected by return bends. coils can be the same or opposite end connection construction.
Steam Distributing Coils
Supply connections are normally in the middle of the header with no return bends. Rows are limited to 2 rows with 5/8” construction
Direct Expansion (DX) Coils
Coils normally have distributor leads (spaghetti tubes) and expansion valves. These coils can have multiple distributor arrangements
Condenser Coils
The supply connection normally enters at the top of the coil. These coils look similar to a water coil, except for the location of the supply connection. Sub-cooler circuits typically have separate headers and represent a small portion of the coil’s surface.
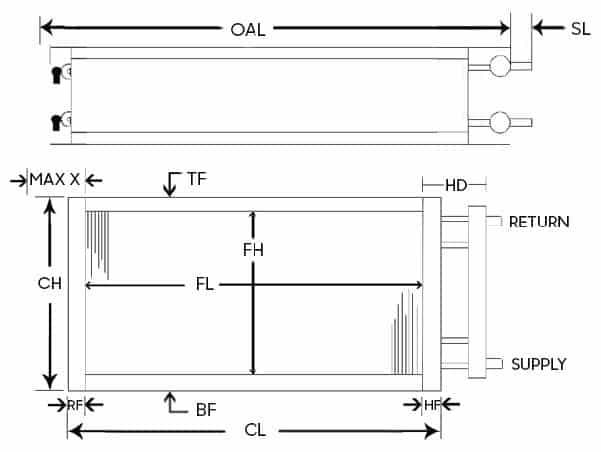
Determine finned height (FH) and finned length (FL)
Finned height is always measured in the direction of the fin. Finned length is always measured in the direction of the tubes, regardless of which direction the tubes are running.
Determine casing height (CH)
Casing height is always measured in the same direction as finned height (FH). It includes the casing/sideplate flanges (B) on the top and bottom of the coil. In some instances, the flanges may be flat at the top and bottom, so you are only measuring finned height plus the metal thickness.
Determine casing length (CL)
Casing length is always measured in the same direction as fin length (FL). It includes the tube sheet flanges (A) on the ends of the coil. Some coils may actually have baffles covering the headers and should be included in your casing length measurement.
Determine the number of rows
Rows are always counted in the direction of airflow, regardless of how the coil is mounted. Count rows either by viewing the header end or the return bend end of the coil. When viewing either end, remember that the return bends or headers may run unevenly across the coil.
Determine fins per inch (FPI)
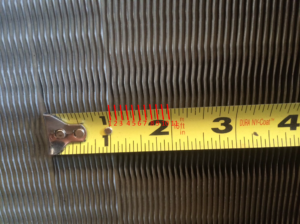
Fins Per Inch (FPI)
Fins per inch is pretty self-explanatory, we want to count how many fins are within one inch. Using a ruler or tape measure, count the number of fins on the coil within one inch. Normal fin counts will be between 4 and 14 FPI.
Determine casing depth (CD)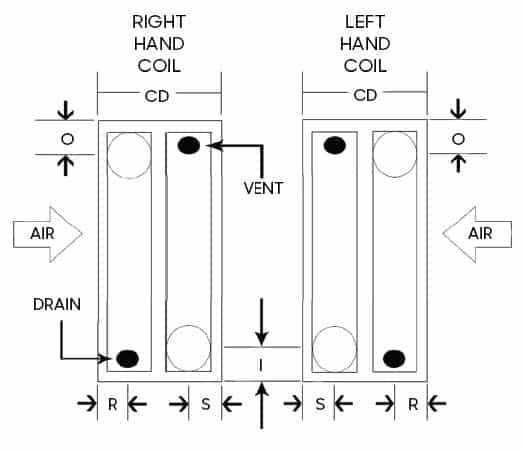
Casing depth is always measured in the direction of air flow. Casing depth will normally be 4” to 6” for hot water and steam coils, and 6” to 15” for chilled water and direct expansion coils.
Determine overall coil length, including headers (OAL)
Overall length is one of the most important dimensions to be obtained because most coils only have connection stubs extending outside the walls of the unit. Overall length is measured from the outside edge of the header end – not including connections/stubs
(S) – to the outside edge of the return bend end, plus any baffles extending beyond the header or return bends.
Determine overall coil length, including connection.
Add the length of the connection stub (S) to the overall length (OAL) determined in step 5. This measurement is important for two reasons: 1) because some manufacturers include connections within the casing length of the unit: and 2) because piping cannot be moved.
Determine connection size and type

Note your connection type for replacement or new connection needed for system repiping.
If necessary, remove insulation to see the incoming and outgoing lines. Measure the diameter of the outside of the line to help determine connection size.
Standard connection types are MPT (male pipe thread), FPT (female pipe thread), ODS (sweat connection,) and Victaulic. MPT is threaded on the outside, FPT is threaded on the inside, ODS connections have no threads, and Victaulic connections have a groove around the outside.
Determine air flow

Air flow is described by the direction in which air is flowing through the coil. Horizontal air flow is air running through the coil from wall to wall in the room. Floor-to-ceiling is vertical air flow. If the coil is mounted vertically (i.e. on the wall) air flow is horizontal. If the coil is mounted horizontally (i.e. on the floor or ceiling) the air flow is vertical.
Determine the number of tubes per row
Count the number of tubes that are in the row. The number of tubes is important when ordering an exact replacement.
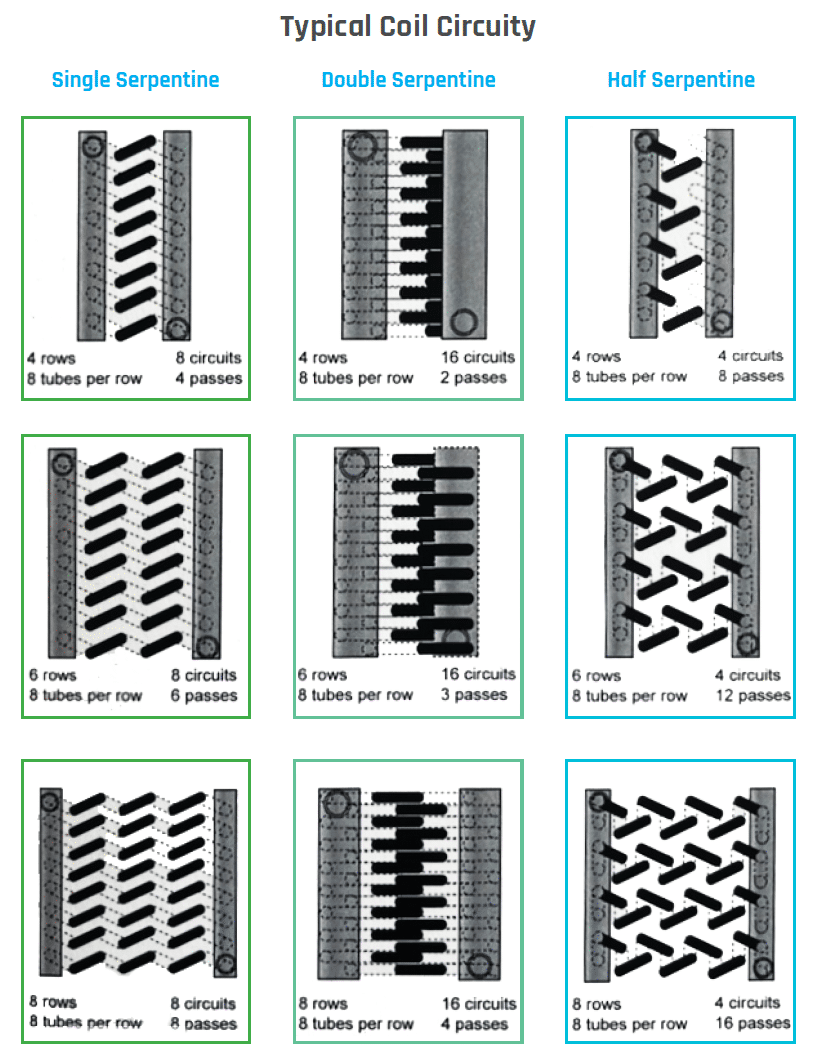
Determine the coil circuitry
Coil circuitry is determined by the number of tubes going into the header divided by the number of tubes in the first row. See the diagram below for reference.
Tips & Tricks
- The more information the better! If you use a measuring template, you’re less likely to miss something
- Videos and pictures in addition to a measuring template are very helpful. Put your phone camera on .5 lens to take a video or picture in a tight space.
- Circuiting is important! Tubes in the header AND tubes in the face.
- Get horizontal and vertical centers of pipe connections, max AHU L, H, and D inside of unit.
- Silly putty can be a useful tool to help get FPI measurements in dark spaces. Roll out the putty and take an imprint of the fins so you can easily measure outside of the AHU. Gum can also work in a pinch, but we don’t recommend chewing it after measuring!
- Measure Twice.

